


Sweet Summer Sensation: Candy Cane Science Showdown
Sweet Experiments: Turning Candy Canes into Summer Science Fun
Picture this: a frosty candy cane floating like an ice‑cream pole, a rainbow of melted ice cubes dripping like liquid sugar, and a kitchen turning into a science lab—all while staying absolutely scrumptious. If you’re looking for a way to sprinkle some brilliance into your summer afternoons, these candy‑cane experiments are exactly what you need.
Why Candy Canes Are Summer’s Secret Lab Resource
- Non‑fictional Fun: They’re sweet, bright, and surprisingly sturdy.
- Kitchen‑Safe: No flammable liquids, no complex machinery—just what you’d already have on your grocery shelf.
- Versatile: From physics to chemistry, candy canes can showcase them all.
Experiment #1 – “The Floating Candy Cane”
This is the classic, but it gets fresh with a pinch of salt and sparkling ice.
- Gather:
- 1‑10 candy canes (longer ones work best)
- Cold, sparkling water
- Common table salt (1‑2 tablespoons)
- Ice cube tray (optional for a “ice” effect)
- Mix it up: In a small bowl, dissolve the salt in the sparkling water until fully saturated.
- Add the ice cubes: Drop a few cubes into the bottle, then spoon in your candy cane.
- Watch & record: Use your phone or a webcam to capture the marble‑like floating candy cane. Turn it into a mini‑science show.
Science lesson: The candy cane floats because of the lower density of the saltwater mixture, which creates a buoyant force greater than the cane’s weight.
Experiment #2 – “Melting Rainbow”
This one’s literally neat because you get a rainbow (or at least, a colorful gradient) that’s as beautiful as it is instructive.
- Set the stage: Place a candy cane beside a glass of warm water.
- Heat it! Gently warm your water until it’s just warm enough—aim for 40‑50 °C. Use a kitchen thermometer or your intuitive “hand‑touch” method.
- Be patient: The sugar on the candy cane will start to dissolve and dribble, forming a colorful syrup trail.
- Switch it up: Try adding actual food coloring. Each drop will turn into a separate streak in real time.
Science lesson: The syrup is sugar in solution—glucose and sucrose molecules dispersed—this is a basic example of solubility.
Experiment #3 – “Cane‑chip Meltdown”
Think of it as a “snack-version” of a science experiment.
- Preparation:
- Take two candy canes, slice them into thin pieces (use a butter knife or a cookie cutter).
- Get a small saucepan, pour a measured amount of plain milk, and bring it to a low boil.
- Thermometer‑time: Measure the temperature. You’re aiming for a sweet spot – about 65 °C is enough to make the sugar melt but not cause scalding.
- Add the ca…
- Drop the thin slices into your warm milk. Watch them get softer—near the edges they’ll become translucent and gooey.
- Dine with a flair: Slide the melted slices onto a piece of toast, drizzle with honey, and enjoy the “science broth.”
Science lesson: The cane slices act as a thermal sink, absorbing heat, while the sugar dissolves in the liquid, forming a unique “sweet bath.”
Tips for an Epic Science Night
- Turn your kitchen into a chalkboard boardroom by drawing the experiment steps in chalk.
- Use a camera (your phone is fine) to record the process; analysis of the video can reveal the exact moment of dissolution.
- Keep a notebook nearby; jot down observations like “tension held, sugar talks.”
Safety 101
Fire‑proof framebuffer: These experiments are mostly low‑risk, but avoid direct flames or high temperatures. When dealing with warm liquids, use oven mitts or a good kitchen towel. Keep children supervised, especially with hot water or hot milk.
Wrap‑Up
So grab those candy canes, your kitchen gear, and let the summer science pop. It’s not just about fun—it’s also about turning everyday items into materialized lessons. With each experiment, you’re building an anecdote, a lesson, and maybe a sweet story to tell next holiday gathering. Happy experimenting, and enjoy the sweet side of science!
Exciting Candy Cane Science Experiment for This Summer
 Evan Lee
June 23, 2025
Sweet Science: Candy Cane Classroom Fun
Parents, rejoice! Your kid’s favorite holiday treat can double as a science lesson—no lab coat required.
Why Candy Canes Are a Sweet Science Tool
- Iconic look – the classic red-white stripes make the experiment instantly recognizable.
- Safe material – a plain candy cane is a non‑toxic, kid‑friendly confection.
- Low cost – one pack of candy canes plus a few pantry staples and you’re set.
Experiment One: The Color‑Change Conveyor
With a handful of knotted candy canes, your child will discover how heat can erase colors.
- Take a candy cane and run a small electrical heater (or use a hair‑dryer on low) near it.
- Watch the crisp white stripes start to blur and fade as the sugar melts.
- Explain how molecules get jumbled when heated, turning a solid into a liquid.
Experiment Two: Sticky Physics
Ever wonder why candy canes leave sticky fingerprints? This hands‑on test reveals the science behind adhesion.
- Peel a strip of candy cane and press it onto a sticky surface (like a magnet).
- Remove the strip and observe how it clings—thanks to sugar’s viscosity.
- Discuss how molecules stick together, and how temperature can change grip.
Experiment Three: Sweet Displacement
Use candy canes to explore volume and displacement—no heavy math required.
- Fill a clear glass with water. Drop a candy cane in and note the water level rise.
- Repeat with a small toy or a matchstick—compare how much they push the water aside.
- Talk about density: lighter objects sink slower, others float, just like your sweet treats.
Get Ready With the Gizmos You Already Have
- All-purpose heater or hair‑dryer (for heat experiments)
- Clear glasses or jars (for displacement tricks)
- Stickers or magnets (to test sticky forces)
Turn your kitchen into a temporary lab—just add candy, curiosity, and a dash of holiday cheer!
What is a Candy Cane Science Experiment?
Sweet Science: Turning Candy Canes Into Classroom Wizards
Imagine swapping your typical holiday storybooks for a handful of bright red and white candy canes and watching those little guys take on a whole new role—scientists, that is!
What’s Really Happening Inside the Spice‑Rimmed Treat?
- Crack the code of dissolution: a candy cane is basically a bunch of sugar crystals. Drop it in water and those water molecules start wrapping around each sugar piece, pulling them apart like a gentle tug‑of‑war. The result? The sweet piece disappears, leaving a sugary splash.
- Melt the magic: when you expose a candy cane to heat (or even a warm spoon), the sugar starts to liquefy. It’s a sweet reminder that temperature changes have a direct effect on the state of matter.
- Float or sink? Play with a sugar‑filled cane placed in a cup of soda versus a cup of beer. Notice how the density differences make a sugary cane swim differently—an easy way to visualise buoyancy.
- React in real life: stir a cane in a little vinegar solution. The sugar goes, and you’ll see fizz as the acid meets the sugar‑crystal structure. It’s like a tiny chemical fire‑fight!
Why the Candy‑First Method?
Kids are naturally curious, and they rally around hands‑on play. When they can peel, feel, litter, and splash the treats, they get more intelligently invested than when they just read about the same concepts on a page. The sugar crystals “talk” to their minds and provide a delicious, tangible reason to understand how materials change.
Boot Up Your Sweet Lab Today
Grab a handful of candy canes, a cup of water, a heat source, and a pinch of vinegar. Experiment, document, and remember what you discover. Watch the sugar dissolve, melt, float, and fizz—this simple swirl of science is sure to keep your holiday table buzzing with wonder.
Want more sugar‑centered surprises? Head over to our playful guide on making a Pumpkin Volcano Experiment at Home and keep those science ideas rolling throughout the season.
Fun Candy Cane Science Experiments for Kids
Candy Canes: Turning Sweet Treats Into Science Adventures
Why Candy Canes Are Your Kids’ New Lab Equipment
Think a candy cane is just a frosty decoration? Think again! Those bright red‑and‑white stripes are actually a gateway to basic chemistry and physics. Give your child a candy cane, and you’ve got a recipe for hands‑on fun that’s as easy to set up as it is unforgettable.
Experiment 1: The Color War
- What you need: A candy cane, a glass of water, a pinch of baking soda.
- What happens: Drop the candy cane in. Watch the stripes dissolve, and when you add baking soda, the water turns a funky new color. The kids get a taste of solubility and reactivity in real time.
- Takeaway: “Colors change when substances collide—just like in a science‑fair battle!”
Experiment 2: The Melting Point Mystery
- What you need: A candy cane cut into thin strips, a small heat source (like a candle lamp with adult supervision).
- What happens: As heat reads, the strands melt at different rates, giving teens and large kids a literal taste of phase changes.
- Takeaway: “Heat turns candy from solid to liquid—just like tomorrow’s homework might turn into a summer adventure!”
Experiment 3: The Force Field Rally
- What you need: A candy cane, a pump, a simple balance scale.
- What happens: Pushing the cane on the balance demonstrates force and friction—kids see how small pushes can create big rotations.
- Takeaway: “Every little shove can bounce a balance, just like a small effort can change a life.”
Why These Experiments Stick
Kids remember the shapeshift of candy, the zesty colors, and the simple sound of a balance sway—because they’re not just learning; they’re experiencing. Every experiment ticks the boxes of fun, interactive learning, and impactful memory.
Wrap‑Up
Next time the holiday lights are out, grab a candy cane and set up a quick lab. Your child will learn chemistry and physics without a single lecture—just bright candy, a dash of curiosity, and a whole lot of wow. Happy experimenting!
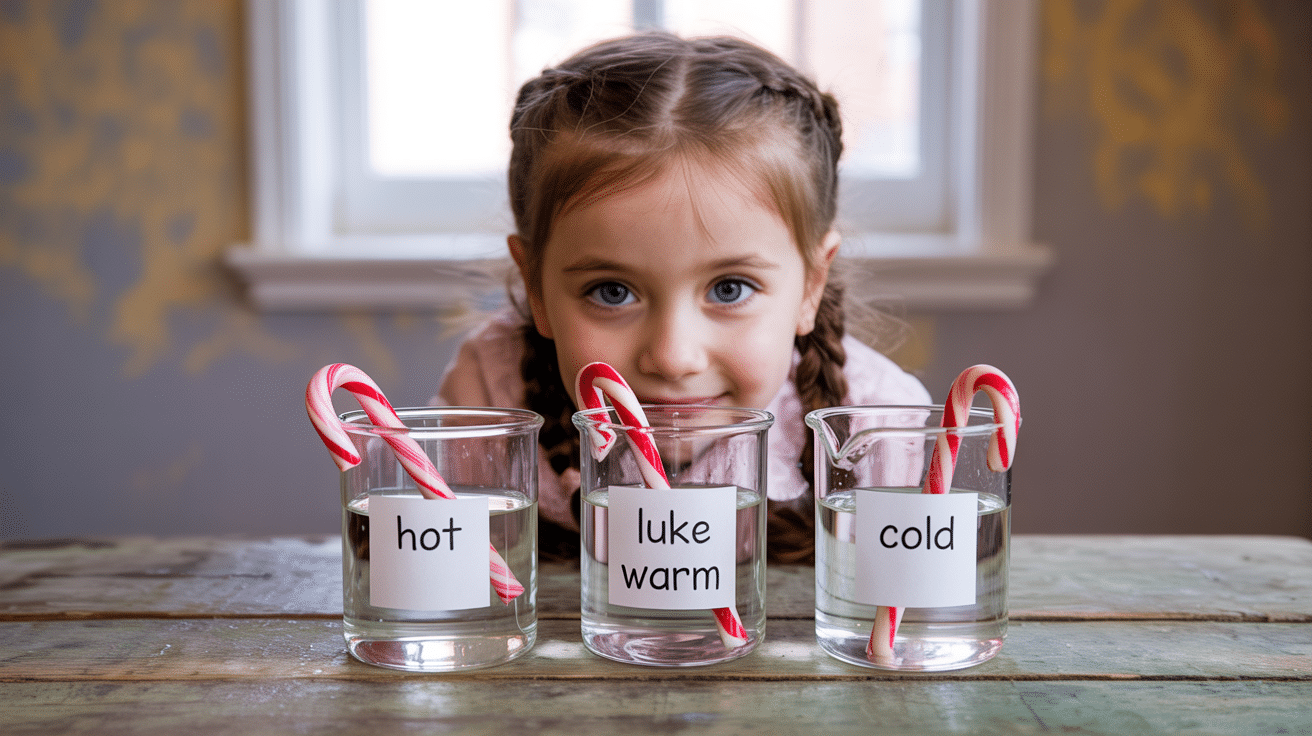
1. Dissolving Candy Canes in Water
Sweet Science: How Hot Water Turns Candy Into Instant Frosting
Ever wonder why a warm bubble tea dissolves sugar faster than a frosty one? Let’s break it down with a fun experiment that turns kids into little chemists.
What the Kids Will Pick Up
- Temperature Goodness – Hot water is a master dissolver; cold water takes its sweet time.
- Molecular Energy – Warm molecules move faster, making the candy dance into the liquid.
- Hands‑On Learning – A quick, low‑cost way to see science happen right before their eyes.
Grab These Simple Items
- Three clear cups (plain beakers work fine)
- Three different water temperatures: hot (just off the stove), lukewarm (room‑tepid), and cold (straight from the fridge)
- Three candy canes – any flavor will do, but peppermint adds a cool twist for the cold cup!
- Timer or stopwatch (a phone works if no one’s around)
Step‑By‑Step Guide
- Heat, Sip, Prove: Scoop hot water into the first cup, make sure it’s steaming but safe. Fill the second cup with lukewarm water, and the third with ice‑cold water.
- Candy Drop: Place one candy cane into each cup. Feel free to whisper an encouraging mantra like “Let the sweetness dissolve!”
- Timer Time: Hit that stopwatch. Let everyone give the candy a good look, then just watch the magic happen.
- Note the Fastest: Does the hot cup watch its candy disappear in a whisk? Does the cold cup hold on longer, like an ice‑cream in the summer? Write it down and maybe draw a little “speedometer” or thermometer doodle.
Make It Extra Fun (Optional)
- Take video clips and share them with classmates—humor + science!
- Host a “Who’s Dare to Drip Candy” challenge and award the winner a silly trophy.
- Ask kids to guess the chemical reason, then reveal the answer—learning + giggles.
That’s it! One simple experiment to show that temperature really does speed up the dissolving dance of candy. Who says learning can’t be sweet and spicy? Happy experimenting!
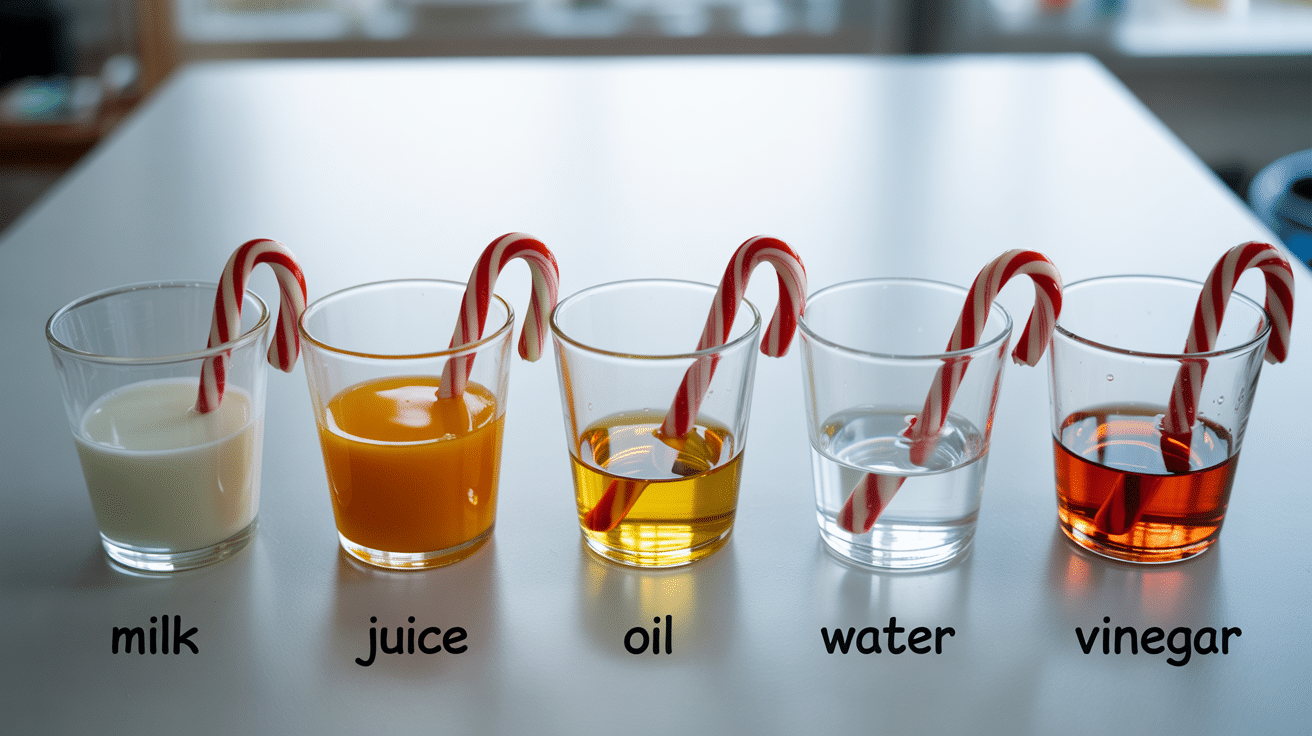
2. Dissolving in Different Liquids
Unlock the Sweet Science of Candy Solubility!
Ever wonder why some candy sticks around longer in your glass of juice than in a pot of hot water? Let’s leak out that mystery with a family‑friendly experiment that turns science into candy‑time fun.
What Kids Learn: The Sweet Dance Between Liquids and Candy
- Polar vs. Non‑Polar Chemistry – Dive into how molecules attract or ignore each other.
- Solubility Speed‑Trials – Watch, time, and compare how fast candy demand(s) dissolve.
- Observation Skills – Learn to sketch, note, and narrate the results, turning data into stories.
Materials: Drive Your Curiosity Engine
- Five distinct liquids (water, vinegar, oil, fruit juice, and milk)
- Five identical candy‑canes (make sure all are the same color and shape)
- Five cups or clear glasses
- Timer or stopwatch
- Notebook & pen (or a digital tablet if you prefer) for jotting observations
Step‑by‑Step: The Sweet Science Lab
- Fill each cup with one of the five liquids – make sure they’re level so the candy cannes sit evenly.
- Drop one candy‑cane into each cup; don’t let them touch the sides or each other.
- Start the timer; behold the first bite of physics as the candy starts to mingle with its liquid partner.
- Observe every minute: are the colors blurring? Is the candy shrinking like a drying flower? Snapshot any dramatic changes.
- At the ten‑minute mark, stop the timer and write down what happened in each liquid.
- Data day! Compare the results: Which liquid is the “sweetest” partner? Does the oil drown the candy or does the vinegar create a little chemist’s storm?
Your Questions to Answer (and the Answers Scientists Already Know)
- Why does the candy dissolve fastest in water and milk? Because those are polar liquids that cling nicely to the polar molecules in the candy.
- What about the slower-paced dissolving in oil? Oil is non‑polar, so it’s less willing to share its molecular space.
- What makes vinegar a champion? The acid in vinegar helps to break down the candy’s sugars.
- And juice? Thanks to a mix of sugars, acids, and water, it’s a robust, mildly polar partner.
Wrap‑up & Fun Extras
After the rinse, rinse and recycle or toss the leftover liquids (stay eco‑friendly!). For a bonus, try altering the temperature: ice‑cold vs. hot water changes the dissolving speed. Or swap candy‑canes for a different treat—does chocolate work better with oil? Experiment, tweak, and keep the curiosity cooking!
3. Dancing Candy Canes
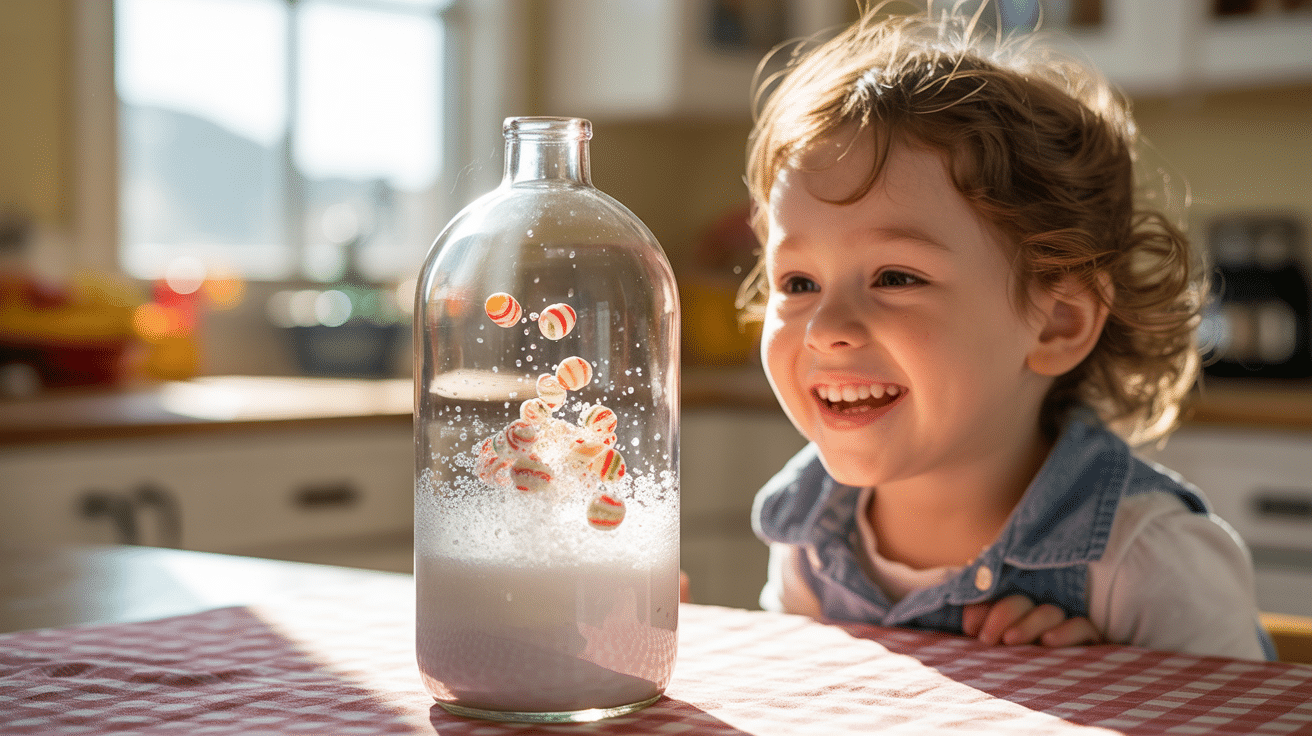
Candy‑Cane Chemistry: A Fun Bubble‑Bust Dance!
What Kids Get Out of It
- Gas‑Making Magic: Watch chemical reactions create bubbling gas that makes candy pieces swirl around.
- Learn Acid‑Base Happenings: See how vinegar (an acid) and baking soda (a base) team up to produce a fizzy, fiz‑tastic reaction.
- Hands‑On Discovery: It’s a playful way to feel science, not just read about it.
Essentials You’ll Need
- 1 cup of vinegar
- 1 tablespoon baking soda
- One clear glass bottle, halfway filled
- A handful of crushed candy‑cane bits
Step‑by‑Step Guide
- Fill the bottle about half with vinegar; the liquid will be ready to dance.
- Quickly add baking soda—watch the bubbling begin!
- Drop in the crushed candy‑cane pieces—right away, they’ll start spinning like tiny ballerinas.
- Take a seat, grab a high‑five to the science, and enjoy the show.
Safety Note
Always have an adult supervise this experiment. It’s safe but better done under guidance.
4. Candy Cane Ornaments

Turn Your Candy Canes Into Art—No Chemistry Degree Needed!
Who says science experiments gotta be boring? Melt and reshape your candy canes to turn a simple holiday treat into a cool science demo that’s as fun as it is educational.
Why It’s a Sweet Idea
When heat hits the candy, it flips from solid to liquid—and when it cools, it goes back to being a solid again. Watching a candy cane transform gives you a front‑row seat to the magic of phase changes.
What Kids Learn
- Phase change fundamentals (solid liquid solid)
- How temperature and pressure affect matter
- Creative problem‑solving with everyday materials
You’ll Need
• 6 candy canes
• Cookie cutters (any fun shapes)
• Aluminum foil
• Oven (set to 350 °F)
Step‑by‑Step Guide
- Crack the candy canes into small, bite‑sized pieces.
- Wrap one side of the cookie cutter with foil; this keeps the shape neat.
- Put the cookie cutter in the oven at 350 °F until the candy melts.
- Let it cool fully before removing—no rush!
Heads Up: Adult Supervision Required
Because ovens can get hot, let an adult handle the heat. The science isn’t the only thing that matters—be safe while you’re at it!
5. Candy Cane Sink or Float
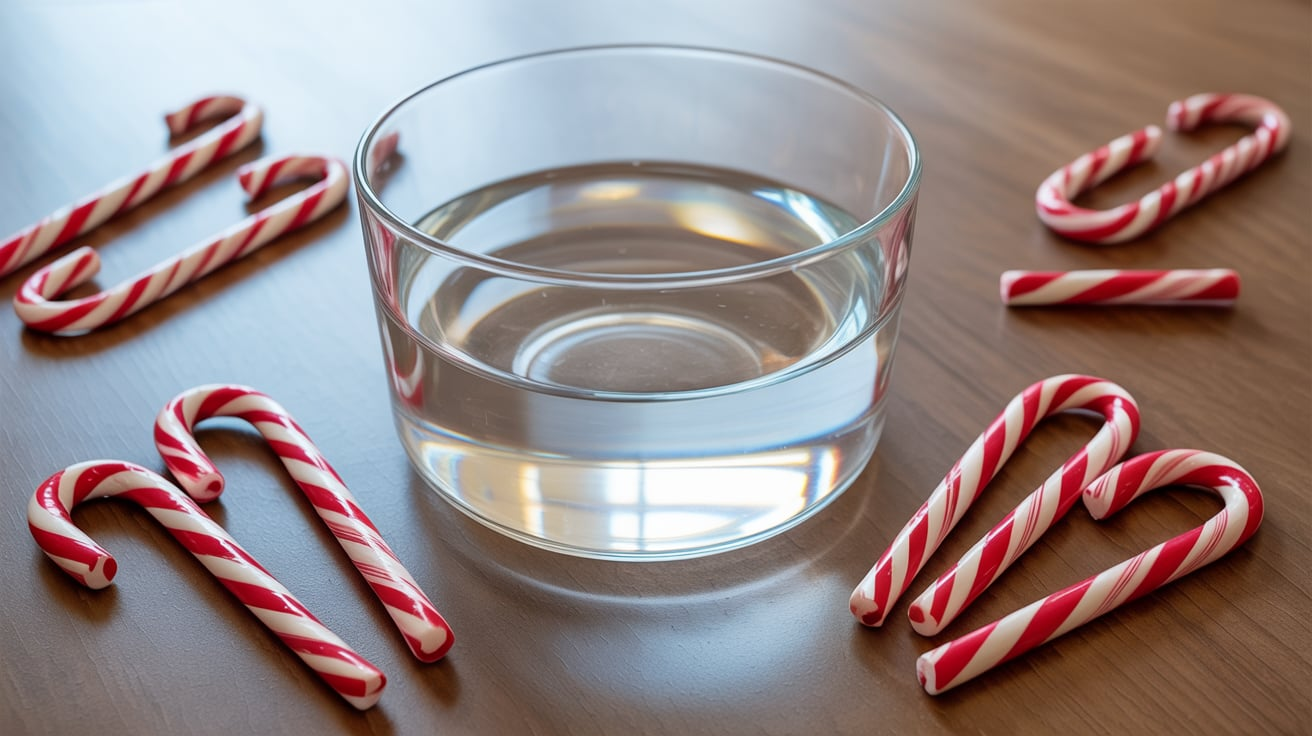
Science Fun: Candy Cane Buoyancy Test
Ever wondered why a sweet treat can or can’t stay afloat? Let’s dive in (literally) and discover the mystery of density with the humble candy cane! It’s quick, easy, and perfect for kids who love a good sugar experiment.
What’s the Big Idea?
We’re tapping into the principle of density—that is, how heavy an object is relative to the space (or volume) it occupies. If an object’s density is lower than water, it floats. If it’s higher, it sinks. The candy cane is a sweet way to see this in action.
Gather Your “Sugar Gear”
- Water bowl or shallow dish (big enough to hold a few candy canes)
- Whole candy canes, ready to be plopped in
- Broken pieces of candy cane of different sizes (break them yourself or buy pre‑cut)
- An eye‑for‑detail: a small notebook or a phone to jot down notes
Step‑by‑Step How to Do It
- Fill the bowl. Fill your water vessel with plain water. Keep the water level steady while you work.
- Test the whole candy cane. Drop a full candy cane into the water. Watch: will it float or dive? Record the result.
- Break it up. Take a candy cane and slice it into smaller chunks. Make sure to vary the sizes (tiny, medium, longer).
- Test again. Drop each new section into the water, one at a time, and see how that changes the floating dance.
- Note the outcome. Keep a quick log: “Whole cane – sinks,” “Large piece – sinks,” “Tiny piece – floats.” Looking at the table will show a clear pattern tying size to buoyancy.
What Kids Keep in Mind
The big takeaway? Density matters so much that the same candy can be a pool lifeguard or a sinker depending on how grubby it is. Even sweet science has a neat rule: lighter than water floats; heavier than water drowns.
Next time your little scientists are craving a sweet treat, ask them to double‑check if the candy cane will stay afloat or go on a swimmer’s adventure. It’s a tasty lesson in physics that sweetens both minds and taste buds!
Safety Tips while doing These Experiments
Staying Sweetly Safe: The Candy Cane Lab Guide
Why Bring a Buddy? The Super‑Tutor Rule
- Keep an adult by your side. The science adventure won’t end on its own—especially when you’re treading in the realm of hot water and buzzing heat.
- Adults keep the game fun and free of oopsies. They’re like the guardian angels of the gummy playground.
Heat Check – Chill Out with Warmitude
- Don’t turn the water into a volcano. Aim for warm, not boiling. You want a cozy bath, not a steam‑sizzle.
- Test the water temperature with a quick “feel‑check” before letting the young explorers dive in.
Clean Up Like a Pro — Dust, Smash, Clean!
- Sticky splashes are not just messy, they’re slip‑sliders. Wipe them up faster than a superhero can swoop.
- A clean surface keeps the campus safe, and it keeps the science vibes real.
Food, Food, Food — Eat Clean & Safe!
- Wash your hands and use clean utensils. Cleanliness is your secret sauce for chomping on science.
- Never taste candy that’s been part of the experiment or that’s danced around dirty spots.
Watch Out for Tiny Treasures
- Candy cane shards can become tiny tricks that might disappear into kids’ mouths. Keep those shattered bits out of reach of the youngest knights.
With the right mix of superhero supervision, smart heat moves, tidy workspace, and tiny caution—kids can scrumple the science world while staying perfectly safe. Happy experimenting!
Final Thoughts
Sweet Science in Your Kitchen
Picture this: a handful of leftover candy canes, a sprinkle of sugar, and your own living room turning into a full‑blown science lab. No fancy beakers, no pricey gadgets—just the simple stuff you keep in the pantry.
Why Candy Canes Are the New Power Tools
- Cheat Sheet for Chemistry: Color‑changing solutions, dissolving sugars, and even a taste test for pH.
- Physics Playground: Hooke’s law in action when you stretch a cane, or explore gravity with a sugar‑drop experiment.
- Biology Basics: Hands‑on look at how sugars ferment or how the ice crystals form in “frosted” cookies.
Bonding While Bonding… the Bond of Science
Parents, you’re not just cooking—you’re creating memories that stick like glitter on a holiday card. Each experiment is a ticket to those moments: the squeals when a “science light” flickers on, the blank‑stare after a “rainbow liquid” forms, and the proud high‑five when a child realizes they’re the real lab head.
Ready to Turn Your Kitchen Into a Lab?
- Grab the leftover candy canes.
- Throw in a pinch of water, a dash of baking soda, or a swirl of vinegar—go wild!
- Set up a little “experiment station” on the table. Include a notebook for doodles and notes.
- Watch the magic, ask questions, and let curiosity run free.
How many sparks of wonder do you see?
Which Experiment Will You Choose First?
Drop your ideas below! Whether it’s the “Candy Cane Cola” fizz, a “Sugar Crystal Labyrinth,” or a “Red‑y‑Light Lemonade”, we’re all ears. Share your results and let us know which experiment stole your family’s heart. Happy experimenting—may your little scientists never run out of sparkles!


