


QuickBooks Data Recovery: The Ultimate Step‑by‑Step Repair Blueprint
Hey, QuickBooks Trouble? Let’s Get Your File Back on Track!
Ever found your QuickBooks company file acting like a glitchy robot? Maybe you’re slogging through a page that won’t load, or the whole thing looks like it’s been hit by a digital tornado. Don’t panic – backing up and fixing glitches is easier than you think.
Why the File Turns Out Broken
- Hard Drive Havoc – If your PC’s disk gets a bit cranky, data can get scrambled. Think of it like a librarian spilling the books on the floor.
- Program Power‑Ups – Updating or patching QuickBooks can sometimes misbehave and leave the file in a half‑finished state.
- Incompatible Extensions – Add‑ons that refuse to play nice with the latest version may start fraying the file’s structure.
- Power Cuts – A sudden outage while QuickBooks is saving can leave your file in an incomplete box.
- Viruses and Malware – Yes, they can sabotage your accounting data, just like they sabotage your emails.
Step 1 – The DIY “Rebuild” Route
First thing’s first: make a quick backup. Copy the .QBW file to a new folder, double‑check it opens, and then you’re ready to roll.
- Open QuickBooks and go to File → Utilities → Rebuild Data.
- Let the tool run – it scans, fixes, and rebuilds. It’s quick, usually under ten minutes.
- Once finished, close and reopen your file. If the red flag disappears, you’re good!
Step 2 – Grab the QuickBooks Tool Hub
Want a more robust wizard? The Tool Hub’s friendlier interface can tackle a smorgasbord of issues.
- Download the Tool Hub from the official QuickBooks site.
- Run the Company File Repair tool – the charming little “Magic Bullet” will do its thing.
- Follow the prompts, then restart QuickBooks to see the cleanup in action.
Step 3 – When You Need a Pro
Still stuck? Time for a professional. Look for a reputable accounting software repair specialist – they’ll use advanced utilities to dig out deeply corrupted data.
- Deliver the backup file (or the original if safe).
- Follow their instructions for a secure restoration.
- Once they return a clean file, open it and enjoy the peace of mind.
Wrap‑Up
Remember: prevent first, then repair. Regular backups, avoiding sudden lay‑offs (power cuts), and staying away from sketchy add‑ons keep your QB file healthy. But if the file does break, you’ve got a three‑step toolbox that will get you back in the game fast. Happy bookkeeping!
What Causes Corruption and Data Damage in QuickBooks Company File?
QuickBooks File Headaches: Why Your Numbers Can Go Eeeek!
Ever feel like your QuickBooks company file is a living, breathing thing that can suddenly act up?
It’s not all in your head – the more it grows, the more prone it is to corruption. Below are the culprits you’d do well to keep an eye on.
1. The Unplanned Power Cut
- Unexpected shutdowns – whether it’s a power outage or a system crash, QuickBooks refuses to save cleanly.
- Result: File corruption that can turn neat tables into a chaotic mess.
2. Sneaky Cyber‑Baddies
- Malware and hacks can sneak in, cause downtime, and even wipe out valuable data.
- Takeaway: A robust backup keeps the bad guys from claiming bragging rights.
3. The Bad Drive Sector Blues
- Hard drives aren’t forever flawless – bad sectors can make a file inaccessible.
- When the drive goes rogue, your QB data may become a full‑on mess.
Quick Fix & Prevention Tips
- Regular backups – because “sorry, we lost it” is not a winner’s strategy.
- Use stable power supplies or UPS to avoid sudden blackouts.
- Scan your hardware often to catch those pesky bad sectors early.
- Keep security software up to date and treat your QB files like precious treasures.
So next time you’re crunching numbers, remember: the bigger the file, the more important it is to guard against the usual suspects that love to mess with your finance data. Stay vigilant, keep backups handy, and keep that QuickBooks running smoothly!
Steps to Repair Damaged QuickBooks Data
QuickBooks Gone Rogue? No Sweat – We’ve Got a Plan!
Picture this: you’re rolling through your books, and everything’s nice and tidy. Suddenly, the screen pops up a “data corrupted” alert. What’s the cure? Let’s walk through two simple ways to get your QuickBooks back on track – one with the good old backup, the other with a handy repair trick.
1⃣ Has a Backup File (QBB) at Hand?
If you’ve got that trusty *.QBB file saved, you’re golden. Just open QuickBooks, hit “Restore Data,” pop in the backup file, and voilà – your data is back! No tech-savvy required.
2⃣ No Backup? Time to Channel Your Inner Tech Wizard
Okay, the backup’s missing or it’s playing nasty. That’s when we step in with a quick repair routine. Follow these steps, one by one, and your QuickBooks will thank you.
- Close QuickBooks. No, seriously – a good freeze is a good start.
- Navigate your data folder. This is usually found at
C:\Program Files (x86)\Intuit\QuickBooks 2016\Data(path may vary). - Back up the current .QBW file. Yep, copy it. Mistakes happen, and this gives you a safety net.
- Run QuickBooks repair. From the Start menu, type “QuickBooks Repair” and follow the wizard. It scans for errors and does a little fix‑up.
- Reopen QuickBooks. If the repair succeeded, you should see a clean, error‑free window. If not, double‑check the logs for clues.
- Confirm your data’s intact. Browse a few reports. If everything looks good, you’re done. If not, you may need a deeper dive or a backup restore.
And that’s it! Whether you’re sprinting to recovery from a backup or pulling a quick repair by yourself, QuickBooks can usually shrug off the hiccup. Keep a backup schedule in mind for the future, and you’ll stay one step ahead of any data drama.
Step 1 – Verify and Rebuild your QB Data Manually
Quick, QuickBooks: Cleaning Up Corrupted Files the Easy Way
Ever seen an “Oops!” message pop up while you’re juggling spreadsheets in QuickBooks? That’s your data file throwing a tantrum. Luckily, you can put it in line with just a few clicks. Let’s break it down:
Step 1: Spot the Problem
- Open QuickBooks and head straight to the File tab.
- Hover over Utilities—you’ll see a dropdown. Pick Verify Data.
- The program will start scanning your file. Be patient—think of it as a deep cleaning session.
Once the scan finishes, a window appears. Click Expand All to reveal the error details. You’ll notice a list tucked under Item History that tells you exactly where the trouble spots lay.
Step 2: Fix the Gaps
- In the same window, click Rebuild Now.
- QuickBooks will automatically patch the corrupted sections.
- When the rebuild completes, everything should be back to smooth sailing.
Pro tip: If you want extra context about a particular error, look for the link that says See Online Article. It’s a handy guide for digging deeper.
There you have it—no code, no fuss, just a cleaned‑up QuickBooks file ready to keep your finances on track.
Step 2 – Use QuickBooks Tool Hub to Fix Company File Issues
Quick & Easy Fix for Your QuickBooks File Issues
If your QuickBooks (QB) is acting up, don’t get sweated out of your socks just yet. We’ve got a proven routine that’ll get your company file back to smooth sailing in no time.
1⃣ Grab the QuickBooks Tool Hub
First thing you need is the QuickBooks Tool Hub. Just head over to the Intuit website, download it, and fire it up.
2⃣ Hit “Company File Issues”
In the Tool Hub, click on Company File Issues. That’s where all the magic happens.
3⃣ Try the “Quick Fix my File” Option
- Click Quick Fix my File and let it do its thing.
- Hang tight while it runs, eyes on the refresh icon.
- Finish up and then launch QuickBooks. Check if the problem is gone.
4⃣ If the First Fix Isn’t Enough…
Sometimes a single pass isn’t enough. If you’re still seeing gremlins, dive deeper:
- Back in the Tool Hub, click Run QuickBooks File Doctor.
- When the File Doctor dialogue pops up, browse to your company file (.QBW) or search for it.
- Select Check your file and hit Continue.
5⃣ Provide Your Admin Password
When prompted, punch in your QuickBooks admin password and hit Next. The File Doctor will now scan the file for any hidden hiccups and patch them.
6⃣ Final Test
- Once scanning wraps up, launch QuickBooks again.
- Open the repaired .QBW file and hope for the best. Most of the time, your issues vanish.
And that’s it: a friendly, no‑frills rundown to get your QuickBooks back in tip-top shape.
Step 3 – Use a Professional QuickBooks® File Repair Tool
Got a Wrecked QuickBooks File? Here’s a Quick Fix!
Imagine opening QuickBooks and realizing the golden retriever of your company file has gotten into a heap of mud—your data’s all over the place. Don’t fry your eyebrows in pain. There’s a silver lining: Stellar Repair for QuickBooks® Software can swoop in like a superhero and patch up the mess, no matter which country’s version your biz is running—USA, UK, Canada, Germany, Australia, you name it.
Why Stellar is the “BFF” of corrupted files
- UniversalFix: Works with all QuickBooks editions. No worries about a missing plug‑in.
- Backup Buddy: If you have a
.QBBbackup, Stellar can pair it with your.QBWfile for a double‑take, boosting your recovery chance. - Demo, Not Demo‑Proof: Try the free version first to preview what’s salvageable. If the data looks good, you’re good to go.
Step‑by‑Step: Brain‑Stimulating Repairs (aka “No More Data Dread”)
-
Launch the Magic
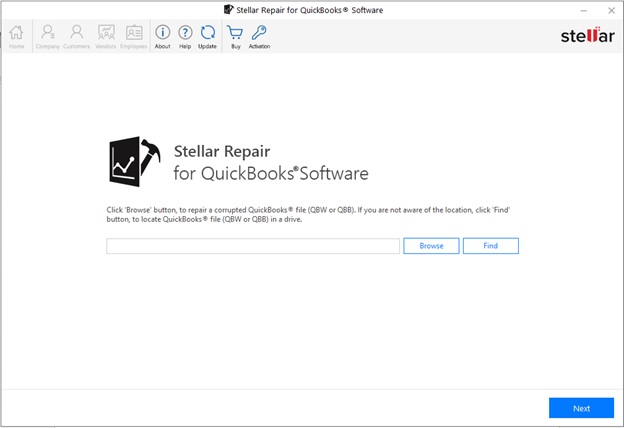
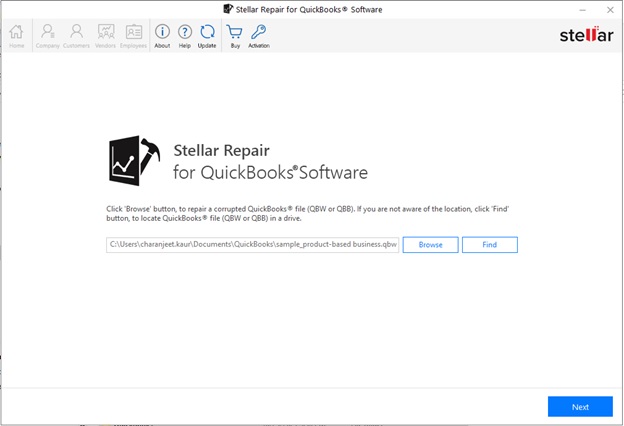
Open Stellar and head straight to the main screen. There’s a Browse or Find button—think of it like a treasure hunt for your corrupted file.
-
Make the Right Choice
Don’t just pick the single corrupted file. Find both the
.QBBbackup and the.QBWcompany file if you have them. That’s the recipe for a smoother, more thorough repair. -
Repair & Preview
Run the repair. If you’re using the demo version, you’ll see a snapshot of what Stellar can recover. Look closely—check balances, transactions, and any stubborn fields. Feeling confident? Move to the full version.
-
Save & Reconnect
Export the healed file and re‑open QuickBooks. If everything looks pristine, you’ve rescued your data from the brink of disaster. If not, revisit the steps or consider pro help.
The Bottom Line
QuickBooks headaches don’t have to be a permanent fix‑up. With Stellar Repair, you can get a second life for chaotic company files and keep the numbers on a tidy path. Your books—and your sanity—will thank you.
Repairing Your File Made Easy
After you’ve selected the file that’s in need of a quick fix, simply click the Next button to kick off the repair process. No more clicking around—just a single tap and the restoration starts!
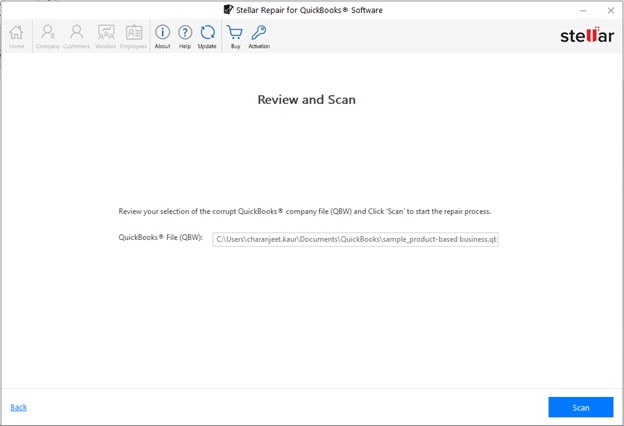
Quick Scan Guide
Got a file you want to check? The software will pop up and ask you to review it—think of it as your friendly gatekeeper.
Step 1: Double‑Check the File
- Make sure the file you selected is the one you actually meant.
- Give it one last look; the right file is the key to a smooth scan.
Step 2: Hit the Scan Button
If everything looks good, simply click Scan and let the software do its thing. It’s quick, painless, and will keep your digital space tidy!
All Your File Records, Even the Gone Ones
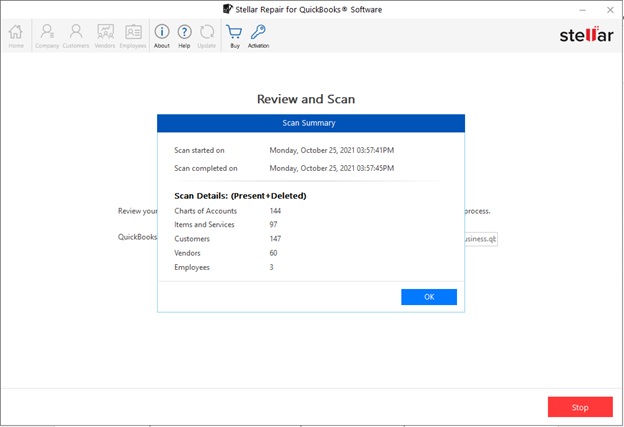
What Happens After the Scan Ends?
Picture this: you press the big green button on your scanner, crank out a file, and the computer pops up a tiny window that’s ready to brag. No, not brag— it’s a summary of everything that went through that folder, present, past, even the deleted ones that would have wanted a second chance.
- All current records – Anything still sitting in the file, ready to be used.
- Deleted records – Remember the ones that never got to finish their story?
They’re still listed. - No surprises – The dialog doesn’t hide anything; it shows every single entry it scanned.
It’s like having a digital detective that tells you, “Hey, here’s what’s still alive and what’s not.” That’s pretty handy if you’re trying to guess what went missing without redoing the whole scan.
Get a Sneak Peek at Your Repaired Data
When you hit OK, the software pops up a preview window that lets you see the tidy-up results from the QB file.
- Company details – all the big picture info is now neat and ready.
- Customers – names, addresses, and contact details are double‑checked.
- Vendors – your suppliers are matched and verified.
- Employees – staff records are cleaned for smooth payroll.
Give it a quick glance to make sure everything looks right before you dive deeper.

Take a Peek at Your Company’s Finance Dashboard
Ever found yourself tapping the Company tab in the preview window and wondering what treasure awaits? Spoiler: it’s a goldmine of financial data pulled straight from your Charts of Accounts and Items & Services.
What You’ll Uncover
- All the account headers and sub‑entries that make up your accounting structure.
- Every item and service you’ve cataloged—ready for reporting and analysis.
- A bird’s‑eye view of the hierarchy that keeps your numbers organized and on track.
Screenshot Snapshot (illustrated below)
Below is a snapshot showing the preview of the Charts of Accounts. In a real interface, you’d see a tidy, color‑coded list of accounts, each with its own level and status.

Why This Matters
- It lets you verify that every account is correctly set up before you start influencing your financial reports.
- Seeing the data in context helps catch inconsistencies that might otherwise slip through.
- It’s a quick sanity check that can save you hours of troubleshooting later.
So next time you click that tab, enjoy the little dance of numbers lighting up—because a healthy dashboard is just a click away.

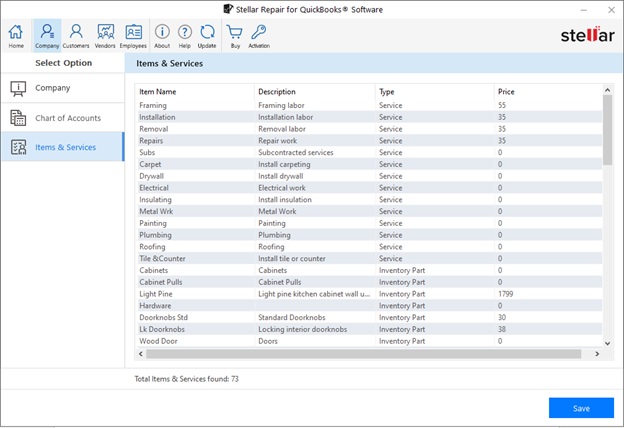
Sneak Peek the Fix!
Take a look at the screenshot below: it’s the “Items & Services” section after a slick makeover. The data looks spotless, and everything’s finally playing nice.
What Did We Repair?
- Missing Fields: All those blank spots are now filled with accurate info.
- Improved Alignment: Rows are perfectly straight—no more funky misplacements.
- Consistency Boost: Formats have been standardized across the board.
Feeling the Result
It’s like cleaning up a messy desk—everything feels organized, and you can actually find what you need without the usual fumble.
Happy Hours of Data!
Now that our “Items & Services” is tidy, we’re ready to roll forward, all with a smile and a few “aha!” moments along the way.
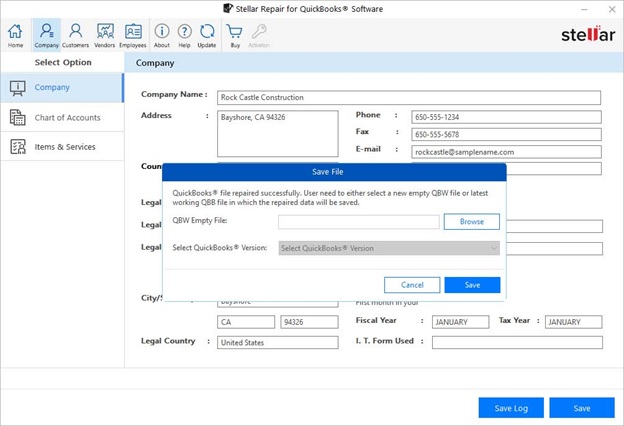
QuickBooks Repair Made Easy
Before you hit the Save button, let’s double‑check the data – it’s faster than digging through spreadsheets later!
Step 1: Spot‑Check the Info
- Customers: Click the “Customers” tab and glance over names, balances, and notes.
- Vendors: Hit the “Vendors” tab to confirm invoice numbers, due dates, and contact details.
- Employees: Switch to the “Employees” tab and make sure payroll info is correct.
Step 2: Save the Repaired File
Once you’re satisfied with the preview, click Save. But there’s a catch – you must activate the licensed QuickBooks® repair version first.
How to Save:
- Open the “Save File” dialog.
- Click Browse.
- Navigate to an empty
.QBWfile location. - Choose that file and click Save.
Hooray! Your cleaned‑up data is safely stored, and you can dive back into normal bookkeeping without the headaches.
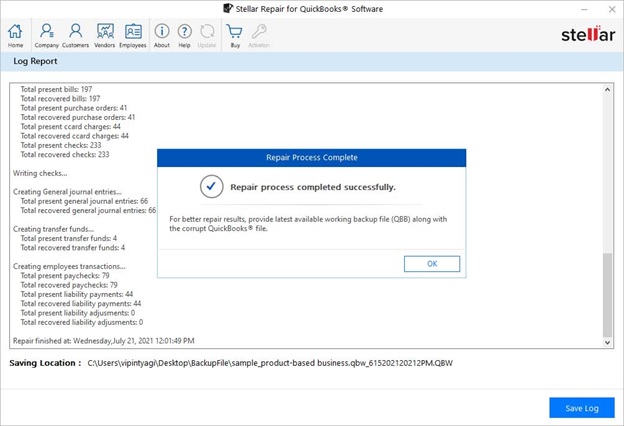
Getting Your Device Back in Shape
Want to give your computer a quick spa day? Just hit the Save button and let the repair wizard do its thing.
- Click Save and watch the magic unfold.
- When the process is done, a friendly “Repair Process Complete” pop‑up will greet you—no sweat, no hassle.
Once that sweet little message appears, you’re all set—your device is ready to roll again!
You’re Almost There: Check Out Your Restored QBQ File!
Step‑by‑Step Cheat Sheet
- Step 1: Grab your trusty file explorer and head over to the folder where that sneaky empty QBW file was parked.
- Step 2: Give it a gentle double‑click. Think of it like opening a mystery treasure chest—only this one should be full of data, not disappointment.
- Step 3: Voilà! Your precious data is back, all shiny and ready to use. Cue the celebratory dance (or just a high‑five to yourself).
Why It Should Feel Like a Victory
After all that back‑and‑forth, seeing your file actually pop up with all the content is the ultimate “hey‑we‑did‑it” moment. Don’t forget to give the file a friendly “thanks” for staying so patient.
Conclusion
QuickBooks Data Rescue 101: Turn Your Computer From “Oops” to “Hurrah!”
Why QuickBooks Gets a Party Crash?
We’ve all seen those horror‑movie‑style flashes on the screen: “Large Company File?” “Abrupt Shutdown?” “Malware Attack?” All three can cause a catastrophic data wipe in the QuickBooks world. But fear not—there’s a way to bring your books back from the brink.
Step 1: Grab the Good‑Old Backup (If You Have One)
- Locate your .QBB file—that’s the backup file that looks like a data‑time capsule.
- Open QuickBooks, go to File > Open or Restore Company and choose Restore a backup copy.
- Follow the wizard, pick the right backup, and voilà! Your data is back.
Step 2: When Backups Go MIA
If the backup is gone, or worse, corrupted, pick up three solid strategies to repair the file:
- Manual Repair Mode: In QuickBooks, press Ctrl+Shift+R while opening the company file. The app will “treat” it like a fine‑tuned software repair.
- Use Built‑In Reports: Create an Audit Trail to check what went wrong—this might help you trace and fix data anomalies.
- QuickBooks Diagnostic Tool: Optionally use the Health Report to run automated checks for corruption signatures.
Step 3: Let a Specialized Tool Do the Heavy Lifting
For the pros who want instant fixes, a dedicated repair program can be your best friend. Try the free trial of “Stellar Repair for QuickBooks.” Run it, let it scan, and you’ll see exactly what bits are salvageable. Satisfied? Go ahead and activate the licensed version—no more “maybe” cheats.
Step 4: Back‑Up, Build‑Up, and Brush (and Check) Regularly
- Once you’ve rescued your data, save the newly fixed company file with a fresh name.
- Create a weekly backup groove; schedule QuickBooks’ backup planner or use an external drive.
- Run a Quarterly build‑up check: Open, run the Company File Integrity Check, and confirm everything’s crystal.
Bottom line: Fast fixes, punctual checks, and regular backups are your ticket to avoiding future “table‑top disasters.” Keep those books hopping and the data disaster‑proof!


