


Get Your Memories Back: Quick Recovery of Deleted Photos & Videos from Memory Cards
Can You Rescue Your Busted Card?
Ever found your SD or memory card hiccuping mid‑shot, suggesting that the gold mine of photos and videos you just captured won’t budge? Fear not—there’s a trick up the sleeve to rescue those precious moments, even when the card has gone rogue.
What Broken Reality Waiting Will You Salvage?
- Picture files that sit stubbornly on the brink of vanishing
- Full‑HD videos that once seemed safe but now refuse to play
- Data from cameras, DSLRs, Android phones or even those humble Western Digital sticks
Why So Many Cards Go MIA?
Storage media, like any gadget, is prone to corruption—bad sectors, accidental removals, or pesky firmware glitches can all conspire to sabotage the integrity of your digital memories.
The Recovery Recipe That Works Across the Board
Below is a fool‑proof approach that’s been tested on:
- Android phone SD cards
- SanDisk & Western Digital flash sticks
- Camera & DSLR memory cards
It’s a cross‑platform method: you only need a computer, a decent USB reader, and a dash of patience.
Step‑by‑Step: How to Resurrect Your Lost Shots
- Connect your card using a reputable reader and allow your OS to detect it—your first test for life.
- Run a file system check. On Windows,
chkdskdoes the trick; on macOS, try ‘First Aid,’ and on Linux,fsck. - Use a recovery tool. Free solutions like PhotoRec or Recuva can fetch most media; for more advanced options, commercial tools let you preview before claiming.
- Save to a separate drive. Never write back to the same card—data would be lost forever.
- Be patient. Recovery can take hours. Keep the coffee flowing.
Quick PSA: Free Recovery Without the Bull–Tor
If your goal is a zero‑cost rescue, remember the following:
- PhotoRec is free, open source, and does a solid job of snatching what’s left.
- Recuva offers a free tier that pulls images and the occasional video.
- Always test the recovered files for integrity before deleting the originals.
Three Fast Fixes for Your “Bad” Card
Want a quick glove‑on fix to stop the corruption from pounding further?
- Don’t pull the card while the camera is off-line—immediate removal can fragment the data.
- Keep firmware updated—stale drivers are a common saboteur.
- Use a high‑quality, compatible card reader; cheap ones often add extra layers of error.
The Bottom Line
Corrupt SD/memory cards are scary, but they are not the end of your digital story. With the right tools and a straightforward plan, you can rescue almost everything and keep your memories alive. Keep calm, trust the recovery tech, and get back to capturing those unforgettable moments.
Can SD Card Be Recovered?
Can You Still Pull Your Memories From a Dodgy SD Card?
Think of your SD card as a teenage diary – it can be wiped out in a snap, but whether you can dig the stories back out depends on a few things.
Case 1: The Card Still Acts Like a Normal Card
- Plug it in – The first sign of hope: if the computer recognises the card, you’re in the game.
- Abort, abort, abort! – Stop using it immediately. Every write operation risks overwriting that precious data you’re trying to recover.
- Data‑recovery tools to the rescue – There are plenty of professional utilities (think Recuva, EaseUS, Disk Drill, etc.) that can peel back the corrupted layers and haul your files back into the light.
Case 2: The Card is Mysteriously Vanishing
- Unseen on the Computer? Better luck with that — the chances of writing to it are slim, maybe none at all.
- Physical Damage – Smash, crack, or heat damage and you’ve got a new problem: the hardware itself is broken.
- Last‑ditch Effort – If the card refuses to cooperate, it’s time to call in the pros. Recovered.io (for example) offers expert services that stand the best shot at reviving what was lost.
Quick Tips to Save Your SD!
- Don’t thumb your fingers on it. Carefully eject it every time.
- Back up the backup – Keep a copy of your data in at least two places.
- Keep it cool. Heat can damage the magnetic layers. Store in a dry, temperature‑stable spot.
Bottom line? If your SD card is still showing up, stay quiet and bring in the software. If it’s vanished or smashed, the odds are grim, but professional recovery services can still give you a fighting chance. Happy data hunting!
What Is the Best SD Card Recovery Software?
Stuck With a Corrupt Memory Card? Don’t Panic—Let’s Reclaim Those Memories!
Ever wonder if your precious photos and videos are forever lost after a memory card hiccup? Chances are not true! With a quick, zero‑pain setup, you can resurrect your data fast. The secret? A free, snappy recovery programme that lets you dig up lost content in a breeze.
Why Go With The Free Version?
- Lightning‑fast scans: Windows loves speed—no waiting for thumb drive “think‑time”!
- All‑in‑One: SD cards, USB sticks, internal drives, SSDs—everything on your desk is fair game.
- No Bucks Needed: Grab the free edition and recover up to 1 GB—enough for a handful of photos or a couple of movies.
- Simple wizardry: Interface you’ll feel at home with if you’ve ever used a smartphone photo app.
MiniTool Power Data Recovery – The Go‑To Free Tool
MiniTool’s Free Edition zips through corrupted or formatted drives, hunting hidden gems that other tools miss.
- Download and Install: Just hit the installer, click “Yes,” and let the magic start.
- Run the Scan: Pick your device—could be S‑C‑, USB, or your fancy SSD.
- What’s Out: The program pre‑labels what it finds: photos, videos, documents, all neatly sorted.
- Restore: Select files that look like a blockbuster and hit Recover. Your lifesaver is under an accessible folder.
Should You Belay Downloading More Add‑Ons?
Nope! The free build does all the heavy lifting. Extra features (like extracting folders or broken copies) are behind a paywall—perfect for those who just need the basic savior.
Final Word
Forget pounding your phone hard and blasting “recovery” backward. With a single click, MiniTool Power Data Recovery’s free edition will rescue your videos and photos from the darkest corners of a corrupt memory card. Let your memories shine again—joyfully, humoristically, and totally hassle‑free.
How Can I Recover My Data from SD/Memory Card for Free?
How to Reclaim Lost Photos from a Bad Memory Card
Picture this: you were on a vacation, snapping epic shots of sun‑kissed waves, but your memory card decided to be a drama queen and crashed itself. Panic? There’s no need. With a click of a button, you can revive those last‑minute selfies and the grand finale of your photo journey.
Why you’ll love MiniTool Power Data Recovery
- Free & 100% clean – no nasty adverts or hidden fees.
- Works on Windows instantly. If you’re a Mac user, just swap to a professional Mac data recovery suite.
- All about the easy‑to‑follow steps that feel like a guided dance through the data jungle.
Step 1: Plug Your Card Into Your Computer
Pop the memory card into a reliable SD card reader – that humble little USB dongle that looks like it was made by an evil sorcerer. Connect it to your laptop or desktop. The goal: make the card visible to your OS so you can give it a gentle nudge toward recovery.
Step 2: Open MiniTool Power Data Recovery
Launch the app from the start menu or desktop icon. The main screen will greet you with a simple, no‑fuss interface. Think of it as the friendly librarian who knows where every lost photograph is hidden.
Step 3: Scan & Restore Those Lost Memories
- Choose the drive that houses your SD card – it will pop up with a familiar letter (C:, D:, etc.).
- Hit “Start Scan” and let the software work its magic. It’ll search for deleted or corrupted files like a detective on a high‑stakes case.
- When the results appear, pick the photos and videos you want back, then press “Save” to your safe destination on your computer.
That’s it! Peace of mind granted—those pictures that once seemed lost are now safely tucked away in your desktop, ready to be re‑shared or re‑sent.
Final Thought
Don’t let a faulty memory card haunt you forever. With MiniTool Power Data Recovery, your past can be resurrected with just a few clicks, turning heartbreak into a hearty “Hooray!” your friends will love.
Step 2: Give Your Memory Card a Thorough Check‑Up
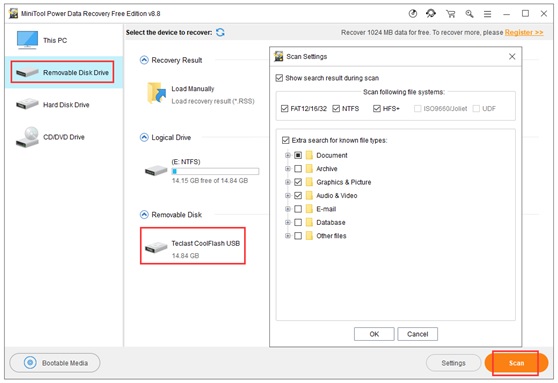
First, head over to the left panel of your recovery software and click on Removable Disk Drive. You should see your memory card pop up on the right. Give it one quick click to select it, then hit the Scan button—this will set the software into detective mode and search for every byte, even those forgotten, missing, or deleted treasures hidden on the card.
If you’re feeling a little selective, tap the Settings icon. There you can fine‑tune the scan to focus only on specific file types—maybe you just need photos or maybe you’re hunting for mysterious video clips.
Step 3: Spot the Lost Gems and Safely Save Them
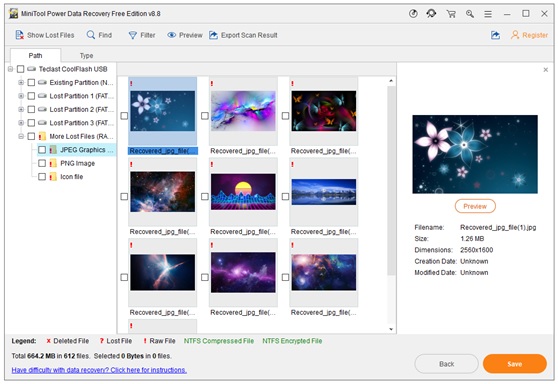
Let the software do its magic and wait until the scan is complete. Once the results are displayed, hunt for those lost photos, videos, or whatever files you were missing. Check each one to confirm it’s the right file.
When you’ve found your content, hit the Save button. Pick a safe path or another storage device where you want to stash the recovered files—think of it as a new home for your digital memories.
Finding Your Lost Photos and Videos
Ever feel like your photos and videos have gone on a vacation without you? Don’t worry—your lost media is closer than you think! Let’s walk through a quick and fun revamp of those search tricks.
1. Take a Peek at the Preview
The first thing you want to do is preview the file. If it looks like the one you’re hunting for, you’re on the right track. Think of it as checking your cart before checkout.
2. Tap into Advanced Filters
- Show Lost Files – This nifty button will zoom in on all the missing photos and videos Sherlock would admire.
- Find (by name) – If even a tiny piece of the file title lives in your memory, give it a whirl. Type it in, hit find, and let the magic happen.
- Filter – Narrow down the results by extension (JPEG, MP4, etc.), size, or even the date. It’s like a super‑sized magnifying glass for your media.
3. The Extra‑Happy Helpers
Once you narrow it down, the lost files will stand out like a bright splash of color in a gray area. Grab them, restore them, and give yourself a pat on the back for being such a detective.
Pro Tips for the Casual Viewer
While you’re at it, try:
- Sorting by date modified to check the newest lost items first.
- Using toggle switches to turn on “Show hidden files” if you’re feeling like an explorer.
Remember, a little bit of digging and a lot of patience can bring back those cherished memories. Happy hunting!
3 Tips to Fix a Corrupt Memory Card
Getting Your Memory Card Back on Track
Ever feel like your trusty SD card has taken a detour into the realm of logical corruption? Hover on, and we’ll walk you through a few failsafe steps to get it right again.
Step 1: Sneak a Virus Check
First order of business—check if any pesky malware is lurking. Pull the card into your PC, launch your favourite antivirus, and run a full scan. If anything sneaky shows up, let the program do its thing and wipe it out.
Step 2: Time for CHKDSK
Next up, we’re calling on the classic Windows toolbox. Connect the card, hit Windows + R, type cmd, and then Ctrl + Shift + Enter to open an elevated Command Prompt. In the window, type something like:
- chkdsk H:/f /r (replace H: with your card’s drive letter)
This command will scour the disk for logical hiccups and bad sectors, fix what it can, and flag troublesome spots.
Step 3: Be Gentle, Be Smart
Sometimes the issue is simply a hasty ejection or a slip‑of‑hand while handling the card. The little square of memory can get scratched or mis‑managed. So be mindful: don’t yank it out in the middle of a transfer, and avoid exposing it to rough surfaces.
If the card still behaves oddly after the scan, try the steps above again, and as a last resort—format it. A fresh format can clear ghost data and restore that card to a staminated state.
Bottom Line
How to Bring Back Your Lost Photos and Videos From a Memory Card
Picture this: you’ve just spent hours digging for that epic holiday photo or that hilarious video with your friends, only to discover that it’s gone missing. Don’t despair! If your SD card or memory card still pops up on your computer, a quick and free recovery tool can bring those precious memories back to life.
Step‑by‑Step Guide
- Check the Card Reader: Make sure the card sits snugly in its reader. A loose fit can sometimes be the culprit behind “not found” errors.
- Pull the Card: Carefully remove it from the device and insert it into your computer’s card reader or a USB adapter.
- Launch the Recovery Software: Download a reputable free SD card recovery program (there are plenty that work great for this purpose).
- Scan the Card: Choose the correct drive letter, run the scan, and let the software do its magic. It will sift through the deleted data to locate your lost files.
- Preview & Select: Most programs let you preview thumbnails or video snippets. Select only the items you actually want to restore.
- Recover to a Different Drive: Save the recovered files to another location (like your desktop) to avoid overwriting anything on the original card.
- Celebrate! Check your newly rescued photos and videos. If everything looks cool, you’re done. If not, try a second scan or a different recovery tool.
Pro Tips to Maximize Success
- Don’t write anything new to the card until you’ve finished scanning. New data can overwrite the lost files, ruining the chances of a recovery.
- Use a read‑only mode if your software offers it—this keeps the card untouched during the recovery process.
- Keep a backup of the whole card after a successful scan. That way, if something goes awry next time, you’re still in good shape.
Common Pitfalls
- Also, NOT! Letting the card sit in an unpowered state for too long can cause the data to become partially corrupted, making recovery harder.
- If the card shows up as “unrecognized” or “damaged,” it might need a physical fix—like new storage or a replacement.
So next time your photos vanish into thin air, just grab your trusty card reader, fire up a free recovery tool, and watch those memories make a comeback. Keep the file names fresh, back up regularly, and you’ll be prepared for any future photo catastrophes—like a sudden photoshopped catastrophe.
 for Thin-Film Manufacturing")

![Prefer Hosting Raja For VPS Server Hosting Systems [2024]](https://www.computertechreviews.com/wp-content/uploads/2021/03/Why-Organisations-Should-Prefer-Hosting-Raja-For-VPS-Server-Hosting-Systems.jpg "Prefer Hosting Raja For VPS Server Hosting Systems [2024]")
